26 mins read
How to publish your Java library to Maven Central with Gradle in 2025
A step-by-step guide to package and publish your Java library to Maven Central using Gradle via Maven Publisher API.
Motivation
Since 2023, the process of publishing a library to Maven Central has changed for newly created accounts. For example, you no longer need to create Jira tickets for new projects. You cannot work with Maven Central as a Nexus repository from your CI/CD pipeline anymore. Moreover, there are fewer all-in-one publishing plugins for Gradle, and automation processes are different. Use this guide to understand how to publish your Java library to Maven Central, how to deal with the new publishing process via API, and how to automate it with Gradle.
Intro
Welcome! Follow this guide to learn how to publish your Java library to Maven Central with Gradle in 2025. It covers essential aspects of Java packaging and Gradle plugins, ensuring your library meets all requirements for successful publication. Whether you're new to Java library packaging or looking to optimize your Maven publishing workflow, you'll learn everything you need to know, including namespace preparation, artifact signing, and automating uploads. All code samples are available in the GitHub repository.
What steps will we take:
This guide is divided into three main sections, and you can jump to the section you need based on the content you are looking for:
- Step 1 describes how to set up your Maven Central account, and how to create and verify a namespace.
- In Step 2, you will learn how to package your Java library correctly according to Maven Central requirements, how to prepare Java artifacts with Gradle plugins, how to generate POM files with Gradle, how to generate checksums and sign artifacts with GPG in Gradle, and how to make a Gradle repository point to a local directory for testing, and how to publish to a local Maven repository with checksums.
- Go to the last step to learn how to upload your artifacts to Maven Central manually or using popular Gradle plugins like
maven-publishandJReleaser.
Prerequisites
Let’s briefly describe what you should have to follow this guide and successfully publish your library to Maven Central:
- You should have access to the package domain of your library. If you don't have any domain, you can use
io.github.<your-github-username>as a domain (or register a required domain with any registrar and come back here to continue). - You should use an account in Sonatype created after 2023.
Also, I hope you have:
- Set up JDK on your machine
- Basic knowledge of the Gradle build system
- Familiarity with a Linux shell
- Git and GitHub basics if you want to use the same repository for your library
Step 1: Prepare your account and namespace in Sonatype
Detailed and up-to-date documentation on how to create an account and publish in Sonatype can be found here. In this section, we will briefly describe the required and most important parts of the process.
1.1. Create an account
Register or log in to your account in Sonatype at central.sonatype.com
1.2. Set up a namespace
First, you need to create and verify a unique namespace if you haven't done it before. The namespace of your library should use the reversed-DNS form of a domain owned by you. There are two main options for this:
- One option is to use a code hosting service (such as GitHub, GitLab, or Bitbucket) and link the package like
io.github.usernameto your account. - Alternatively, you can use a custom domain as your namespace. This requires access to your domain registrar to prove ownership by adding a TXT record to your DNS settings.
Once the domain is verified, Maven Central will recognize it as yours, allowing you to upload packages under any subdomain of your base namespace, such as com.example.project or com.example.utils.
Note: Proposed top-level domains
There are some top-level domains that cannot be used as domain namespaces: for example *.info, *.aero, *.name.
Most of the proposed domains are restricted. I didn't find any official list of restricted domains, but if you know
some of them, please let me know in the comments or direct messages.
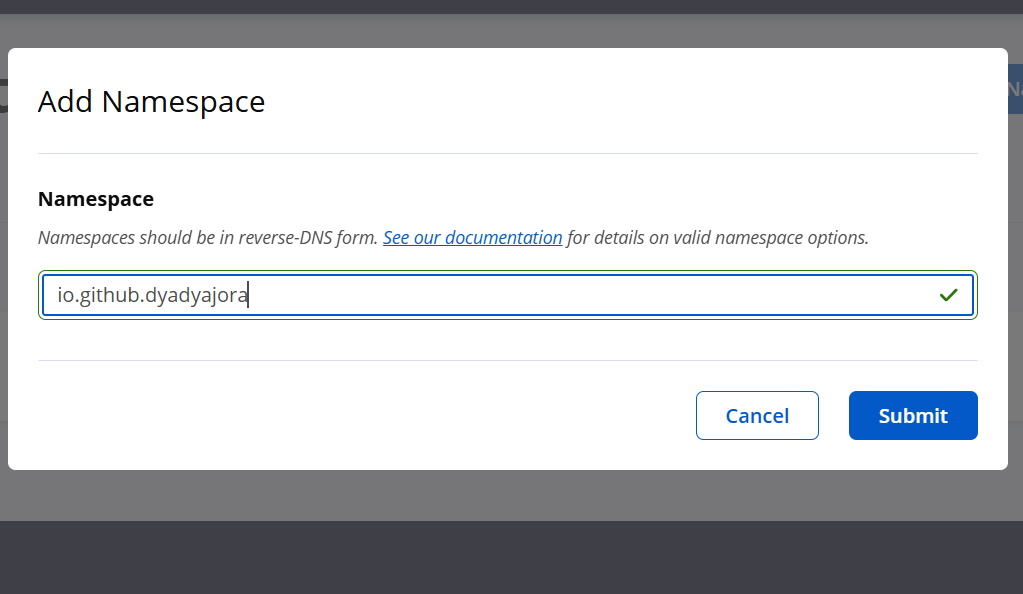
To register a namespace, go to central.sonatype.com/publishing/namespaces and click on the button "Add Namespace".
Next, to demonstrate setting up a namespace both ways, let's look at how to create a namespace using the io.github.username option or through domain registration.
Choose the most suitable way for you.
GitHub namespace verification
To get the correct GitHub namespace, you should convert your profile page link github.com/your-github-username to the following form: io.github.<your-github-username>.
You should use this namespace (directly or with subdomains, for example, io.github.your-github-username.subdomain) in your gradle.properties file in the group field and as the base package for your library.
After that, you will have a namespace in an unverified state. To verify it, you should create a temporary repository in your account to approve ownership.
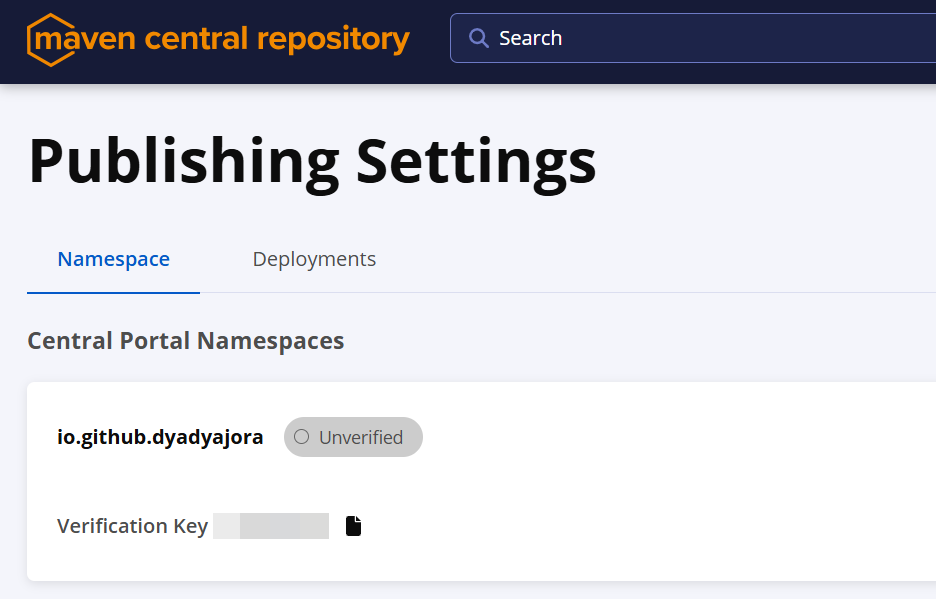
Here will be displayed the code and the name of the repository that you should create in your account.
Go to your GitHub account, create a repository with the same name.
Ensure that you have a repo with a URL like github.com/your-user-name/your-verification-code.
Then in namespaces on Sonatype, you should click on the button "Verify namespace" and click "Confirm".
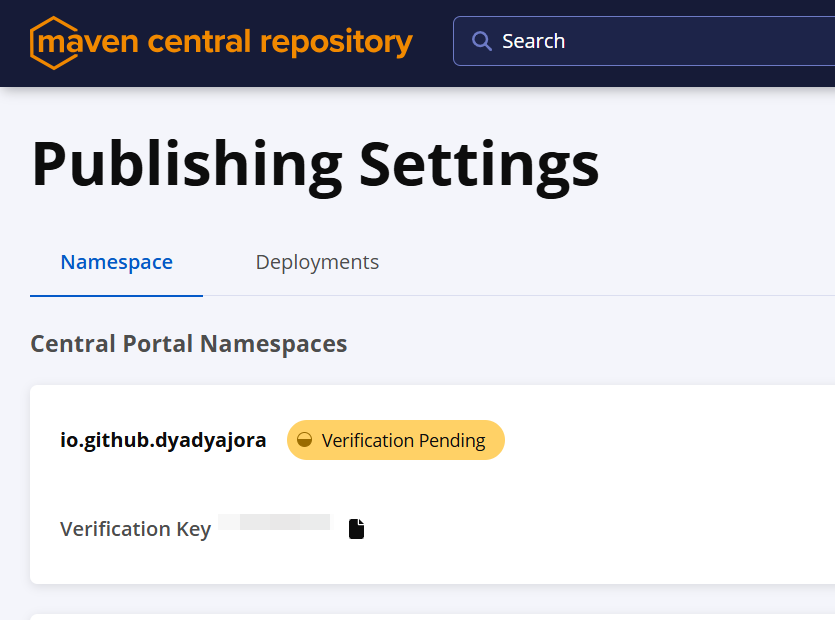
Wait a couple of minutes until verification is completed.
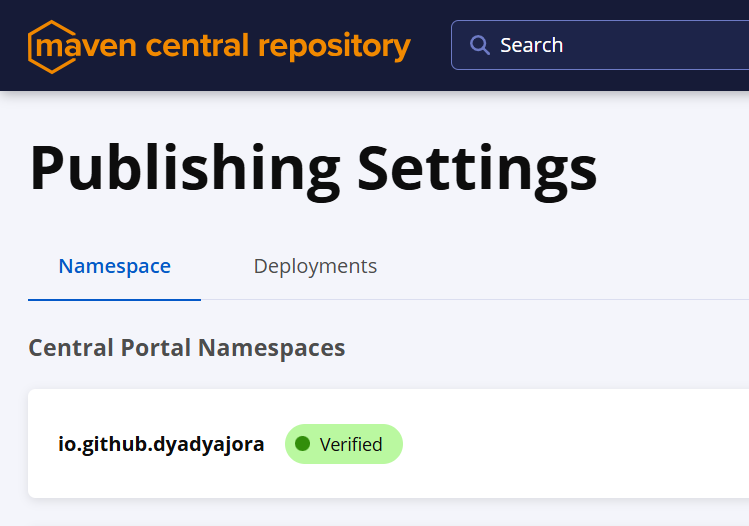
After verification is completed, you can delete the previously created repository in your GitHub account. Now you are able to upload your artifacts to Maven Central with this GitHub-based namespace.
Custom domain namespace verification
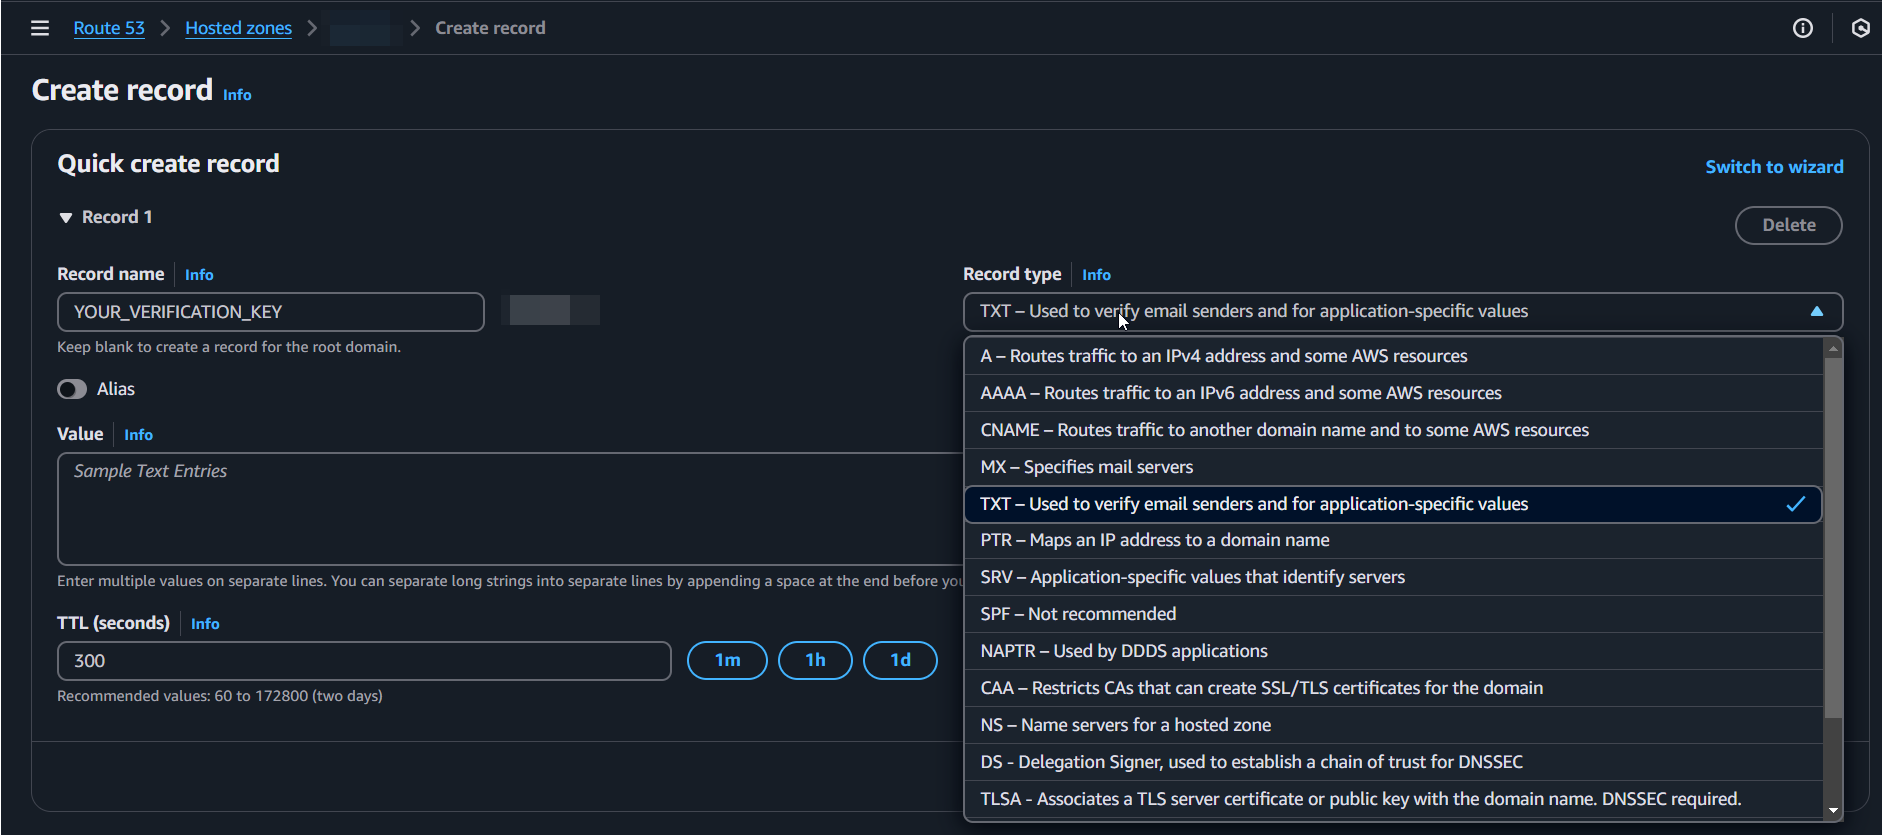
In case you want to use your custom domain as a namespace, you should add a verification TXT record to your DNS settings with the following verification key as a subdomain.
For example, let's look at AWS Route 53, but you can use any other registrar.
Go to your AWS console, find the Hosted zones feature of the Route 53 service, click on your domain, click on the button Create record, choose TXT record type, fill Record name with your verification key, fill Value with your verification key from Sonatype, click on the button Create record.
After that, as with the GitHub namespace, you should click on the button "Verify namespace" and click "Confirm". Wait for verification to be completed. After that, you can delete the added TXT record from your DNS settings. Now you are able to upload your artifacts to Maven Central with this custom domain-based namespace.
1.3. Generate credentials
The next important step is to generate credentials for your account.
Go to your account page on central.sonatype.com/account, click on the button Generate User Token, copy the generated username and password to the clipboard, and save them in a safe place for future use.
Step 2: Package your Java library
Let's take a closer look at how a packaged Java library should look and what requirements should be met to publish it to Maven Central. The complete list of requirements can be found in Sonatype docs. Let's describe the required parts of the library package and learn how to fill them with Gradle.
There are next required files for your library:
- JAR file with your library (
*.jar) - JAR file with sources (
*-sources.jar) - JAR file with javadoc (
*-javadoc.jar) - POM file (
*.pom)
For each of these files you should:
- sign with GPG and have signature files (
*.asc) - generate checksums (
*.md5,*.sha1)
Library package structure should look like this:
io/github/your-github-username/gradle-publish-boilerplate/0.0.1/{artifact files}2.1. Follow Java library structure
Gradle, through the standard Java plugin, supports the generation of library jar as same as javadoc and sources jars out of the box.
You can gradle clean build to generate the jar file with your library.
Also use gradle javadoc + gradle sources or gradle javadocJar + gradle sourcesJar tasks to generate content for or whole jars with docs and sources respectively.
Or enable them in your build.gradle file with the following code:
plugins {
    id 'java'
}
// ...
java {
    withJavadocJar()
    withSourcesJar()
}
// ...
Then run gradle build to generate jars and receive the following structure in the build/libs directory:
gradle-publish-boilerplate-0.0.1-SNAPSHOT-javadoc.jar
gradle-publish-boilerplate-0.0.1-SNAPSHOT-sources.jar
gradle-publish-boilerplate-0.0.1-SNAPSHOT.jar
You can put custom logic to generate javadoc and sources jars in your build.gradle file by overriding Jar type gradle tasks.
task sourcesJar(type: Jar) {
    from sourceSets.main.allSource
    // your custom logic here
    archiveClassifier.set('sources')
}

task javadocJar(type: Jar) {
    from javadoc
    // your custom logic here
    archiveClassifier.set('javadoc')
}

artifacts {
    archives sourcesJar
    archives javadocJar
}
2.2. Fill required POM fields
To publish a library on Maven Central, your POM file must include the following required metadata:
- Project Coordinates: groupId, artifactId, and version to uniquely identify your library.
- Name: A concise, user-friendly name for your project.
- Description: A short summary of what your library does.
- URL: A link to the project homepage or repository.
- Licenses: Specify at least one license under which your library is distributed.
- Developers: Provide your name and contact details or those of your team.
- SCM (Source Control Management): Include the repository URL (e.g., GitHub link) for your source code.
What looks like a problem here? We are using Gradle, not Maven, so we don't have a pom.xml file.
However, we can generate it with Gradle and fill the required fields with Gradle properties.
To manage Maven Central publications and handle POM code generation, you can use the maven-publish plugin.
Let's take a look at its setup:
plugins {
    // ...
    id 'maven-publish'
}

publishing {
    publications {
        myPub(MavenPublication) {
            from components.java
            pom {
                name = 'Gradle Publish Boilerplate'
                description = 'My boilerplate for publishing Java projects with Gradle'
                url = 'https://github.com/username/repo'
                licenses {
                    license {
                        name = 'The Apache License, Version 2.0'
                        url = 'http://www.apache.org/licenses/LICENSE-2.0.txt'
                    }
                }
                developers {
                    developer {
                        id = 'nickname'
                        name = 'Name'
                        email = 'example@example.com'
                    }
                }
                scm {
                    connection = 'scm:git:git://github.com/username/repo.git'
                    developerConnection = 'scm:git:ssh://github.com:username/repo.git'
                    url = 'https://github.com/username/repo'
                }
            }
        }
    }
}
You can run the command gradle clean build publishMyPubPublicationToMavenLocal to generate the required artifacts with this plugin and inspect them in your local Maven repository (~/.m2/repository/your/package/name/version).
2.3. Checksums
Checksums are used to verify the integrity of your artifacts.
In gradle project maven-publish plugin is responsible for generating checksums.
However by default Gradle doesn't generate checksums for artifacts when publishing to local repo using command:
gradle publishToMavenLocalTo deal with it you can add checksums generation to your build.gradle file manually,
but remember: you should not use this for release to Maven Central, because checksums
will be generated in the release process.
tasks.withType(Jar) { task ->
    task.doLast {
        ant.checksum algorithm: 'md5', file: it.archivePath
        ant.checksum algorithm: 'sha1', file: it.archivePath
    }
}
Note: `ant` in Gradle
In Gradle, ant refers to the AntBuilder instance that allows you to use Apache Ant tasks within your Gradle build
script.
Apache Ant is a Java-based build tool, and Gradle provides a way to leverage Ant tasks and scripts directly. Apache Ant provides
a variety of utilities for automating build processes, such as copying files, compiling code, checksum generation, and
more.
In this case, you can generate checksums for artifacts in build/libs running the following command:
gradle clean buildNow you can see the generated checksums for your artifacts in the build/libs directory like above:
...
gradle-publish-boilerplate-0.0.1-SNAPSHOT-javadoc.jar.md5
gradle-publish-boilerplate-0.0.1-SNAPSHOT-javadoc.jar.sha1
gradle-publish-boilerplate-0.0.1-SNAPSHOT-sources.jar.md5
gradle-publish-boilerplate-0.0.1-SNAPSHOT-sources.jar.sha1
gradle-publish-boilerplate-0.0.1-SNAPSHOT.jar.md5
gradle-publish-boilerplate-0.0.1-SNAPSHOT.jar.sha1
There is another way to get around this limitation. You can create an additional repository pointing to the local filesystem location instead of the default ~/.m2/repositories.
For Gradle, it will look like an external repository.
publishing {
  // ...
  repositories {
      maven {
          name = "LocalMavenWithChecksums"
          url = uri(layout.buildDirectory.dir("staging-deploy"))
      }
  }
}
Now you can run locally to publish your artifacts with checksums:
gradle publish -PpublishTo=LocalMavenWithChecksumsTo publish artifacts with the help of the maven-publish plugin you should run the next commands:
gradle publishMyPubPublicationToMavenLocalRepository # to publish to local maven repogradle publishMyPubPublicationToLocalMavenWithChecksumsRepository # to publish to your custom maven repoThese command names were generated by publication name and repository name using the pattern: publish<PublicationName>PublicationTo<RepositoryName>Repository,
where MyPub is your publication name and LocalMavenWithChecksums is your repository name.
Note: sha256 and sha512 checksums are not required for Maven Central, but it is a good practice to generate them. But in case to disable it, it is possible to use the next properties:
systemProp.org.gradle.internal.publish.checksums.insecure=trueAt the current step after the generation of checksums, we have the next generated structure:
gradle-publish-boilerplate-0.0.1-javadoc.jar
gradle-publish-boilerplate-0.0.1-javadoc.jar.md5
gradle-publish-boilerplate-0.0.1-javadoc.jar.sha1
gradle-publish-boilerplate-0.0.1-sources.jar
gradle-publish-boilerplate-0.0.1-sources.jar.md5
gradle-publish-boilerplate-0.0.1-sources.jar.sha1
gradle-publish-boilerplate-0.0.1.jar
gradle-publish-boilerplate-0.0.1.jar.md5
gradle-publish-boilerplate-0.0.1.jar.sha1
gradle-publish-boilerplate-0.0.1.module
gradle-publish-boilerplate-0.0.1.module.md5
gradle-publish-boilerplate-0.0.1.module.sha1
gradle-publish-boilerplate-0.0.1.pom
gradle-publish-boilerplate-0.0.1.pom.md5
gradle-publish-boilerplate-0.0.1.pom.sha1
2.4. Sign with GPG
If you don't know what gpg is, you can read about about GPG keys management in this guide and more about privacy concepts from this article.
To archive requirements of Maven Central, you should sign your artifacts with GPG.
Detailed information about signing artifacts with GPG can be found in the Sonatype documentation.
Lets briefly describe the required steps: create a GPG key, add GPG key ID and password securely to your project,
sign your artifacts with GPG manually or with Gradle signing plugin.
#Generate new GPG key filling the required fields
gpg --gen-key

#List your keys, find the key ID(last 8 chars of key), save it for future use
gpg --list-keys --keyid-format short

#Upload your public key to the keyserver
gpg --keyserver keyserver.ubuntu.com --send-keys YOUR-GPG-KEY-ID
After that, you can sign your artifacts manually using the following command:
gpg -ab gradle-publish-boilerplate-0.0.1-SNAPSHOT.jarOr you can sign your artifacts with Gradle signing plugin.
plugins {
    // ...
    id 'signing'
}
// ...
signing {
    sign publishing.publications.myPub
}
To pass the keyId and password to the signing plugin in a secure way, you should avoid hardcoding them in the gradle.properties file. Instead, you can use CLI arguments, environment variables, or a secure vault. Keyring file location could be set securely in the gradle.properties file.
signing.secretKeyRingFile=~/.gnupg/secring.gpgRun the publishing command one more time passing the required secret argument over CLI for example and you will see that your artifacts are signed with GPG.
gradle clean build publishMyPubPublicationToLocalMavenWithChecksumsRepository -Psigning.password=YOUR-GPG-PASSWORD -Psigning.keyId=YOUR-GPG-KEY-IDThis approach ensures that the sensitive information is not stored in the source code or configuration files.
Now artifacts are signed with GPG and .asc files are generated successfully:
...
gradle-publish-boilerplate-0.0.1-SNAPSHOT-javadoc.jar.asc
gradle-publish-boilerplate-0.0.1-SNAPSHOT-sources.jar.asc
gradle-publish-boilerplate-0.0.1-SNAPSHOT.jar.asc
gradle-publish-boilerplate-0.0.1-SNAPSHOT.module.asc
gradle-publish-boilerplate-0.0.1-SNAPSHOT.pom.asc
To simplify the deployment of artifacts with jreleaser it is required to use key transformation, learn more about it in the next section of this guide.
Step 3. Uploading artifacts to Maven Central
Once you prepare the required artifacts and fill them with the required fields, you can upload them to Maven Central.
3.1. (Optional) Upload artifacts manually
As an optional step, let's try to upload our artifacts to Maven Central manually to ensure that all artifacts are built and signed correctly. You can easily skip this step and go to the next one if you are sure that all artifacts are correct and if you are looking for Gradle automation first.
Let’s try to upload our artifacts to Maven Central manually.
Change version in your build.gradle file to 0.0.1 and run the following command:
At previous steps, we have generated artifacts with checksums and signed them with GPG, run this command again:
gradle clean build publishMyPubPublicationToLocalMavenWithChecksumsRepositoryLibrary artifacts should be generated by the path {workdir}/build/staging-deploy/io/github/your-github-username/gradle-publish-boilerplate/0.0.1.
File structure should be like on the image below:
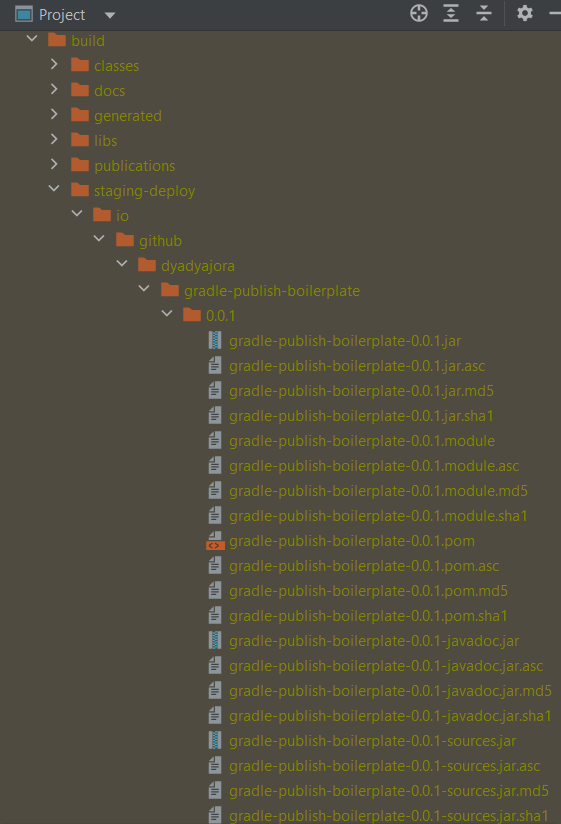
Generated artifact structure
Generate an archive for this folder.
cd build/staging-deploy
# generate archive where "io" is a top level domain of your artifacts.
# it is required to have correct folder structure in the archive.
tar -czvf gradle-publish-boilerplate-0.0.1.tar.gz io
And now you can upload this archive with correct folder structure to Maven Central using the Sonatype UI. Go to central.sonatype.com/publishing, click the button "Publish Component", choose the archive, set deployment name, and click "Publish Component".
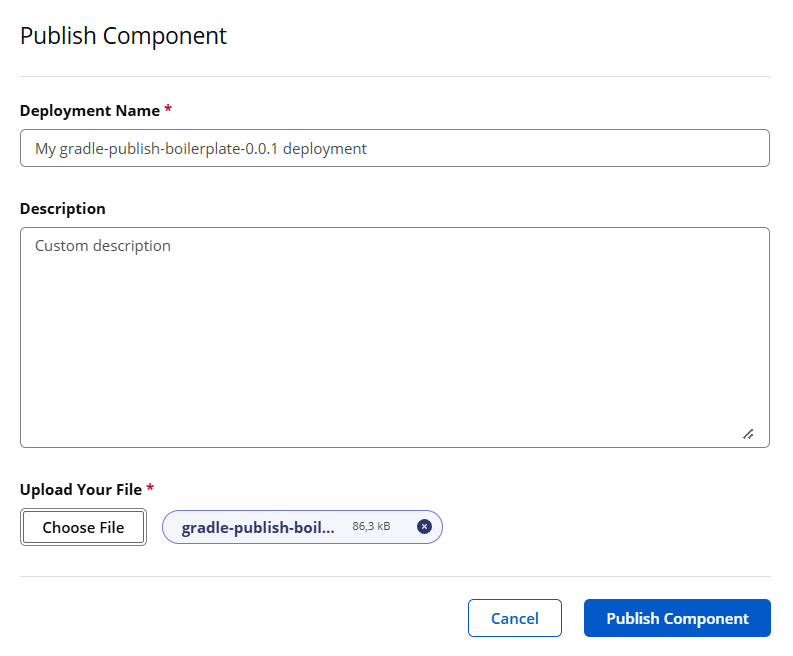
Publish Component modal
After that, the artifact will go to the pending state, you can see it in the list of pending artifacts. Validation of artifacts could take some time, you can see the status of validation in the list.
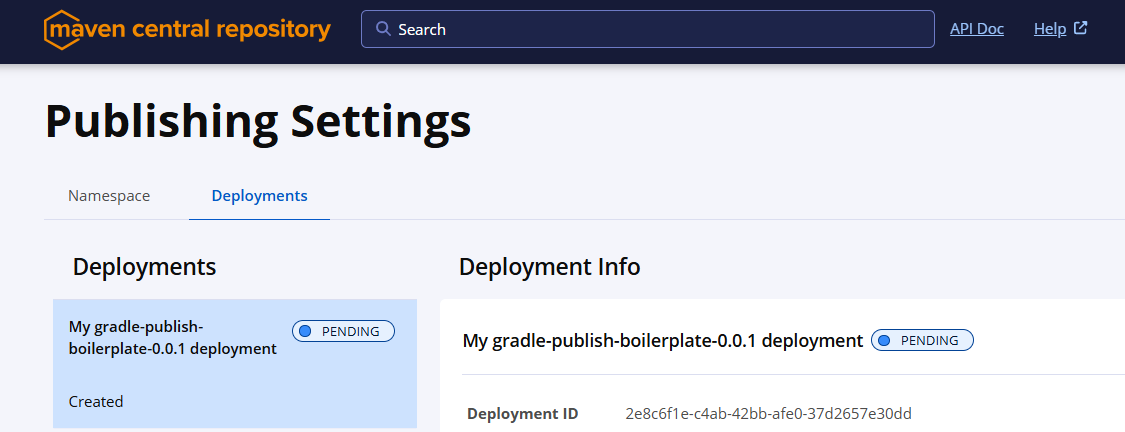
Artifact deployment pending state
Once validation is completed, you can see the status of your artifact in the "Validated" state and recheck your artifact file structure.
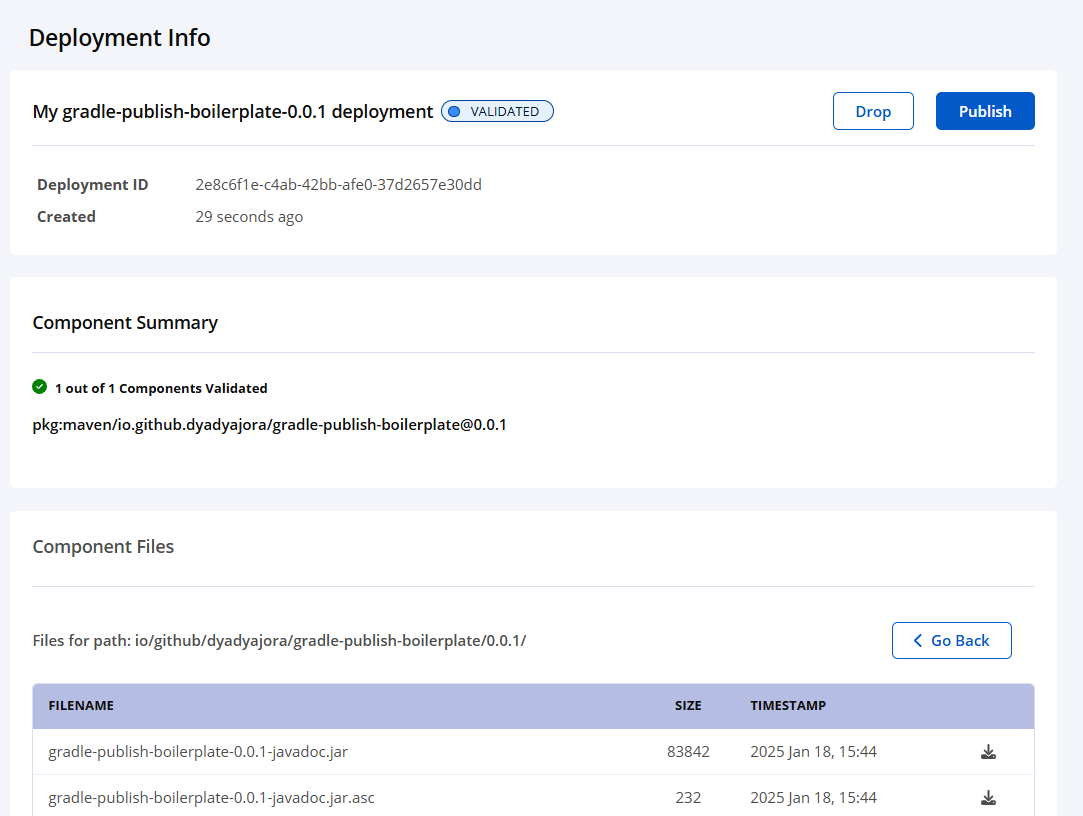
Successfully validated artifact
If you see the "Validated" state, you can be sure that your artifacts are built and signed correctly. Now the component is not published anywhere and you can delete it if you want. Or you can publish it to Maven Central by clicking the "Publish" button on the current page, but be careful this action cannot be undone.
3.2. Upload with Gradle plugins
Danger: You are publishing component
This section describes how to upload your artifact to Maven Central. Be careful and double-check all the steps before publishing your library. Once you publish your library, you cannot delete it from Maven Central. Do not use scripts and actions from this section if you are not ready to publish your library. If you are not sure about the correctness of your artifacts, you can enable snapshots uploading in your namespace settings in Sonatype and try to upload it following instructions in central.sonatype.org/publish/publish-portal-snapshots/ instead of using this section.
Automatic loading of artifacts via the publisher API can be implemented using the JReleaser plugin. This is one of the few Gradle plugins that fully supports the current publisher API. Let's look at its configuration. First of all, it should be noted that JReleaser can sign artifacts automatically before uploading. So we can disable the previously created signing task. Also, it is better to create a new separate local repository directory for JReleaser to avoid conflicts with other plugins.
Prepare folder repository for JReleaser artifacts
Add a new local Maven repository folder for JReleaser artifacts:
publishing {
    // ...
    repositories {
       // ...
        maven {
            name = "PreDeploy"
            url = uri(layout.buildDirectory.dir("pre-deploy"))
        }
    }
}
Disable the signing task in your build.gradle for every publication except our local directory LocalMavenWithChecksums.
signing {
    setRequired {
        gradle.taskGraph.allTasks.any { it.name.contains("LocalMavenWithChecksums") }
    }
    sign publishing.publications.myPub
}
Let's generate artifacts for JReleaser:
gradle clean build publishMyPubPublicationToPreDeployRepositoryVerify that artifacts are generated in the build/pre-deploy directory.
Update GPG keys for JReleaser
The JReleaser plugin can sign artifacts by itself, but you should provide the public and private key in the appropriate format. To do this, you should convert your GPG key to the format that JReleaser can use by running the following command:
gpg --export-secret-keys --armor YOUR-GPG-KEY-ID > private.key
gpg --export --armor YOUR-GPG-KEY-ID > public.key
The path to these files should be provided in the JReleaser Gradle configuration.
Configure JReleaser Gradle plugin
Enable the JReleaser plugin in your build.gradle file:
plugins {
    // ...
    id 'org.jreleaser' version '1.15.0'
}
Add the JReleaser configuration, replacing the required fields with your data:
jreleaser {
    project {
        copyright = 'jora.dev'
        description = 'Gradle Publish Boilerplate project setup'
    }
    signing {
        active = 'ALWAYS'
        armored = true
        mode = 'FILE'
        publicKey = 'public.key'
        secretKey = 'private.key'
    }
    deploy {
        maven {
            mavenCentral {
                sonatype {
                    active = 'ALWAYS'
                    url = 'https://central.sonatype.com/api/v1/publisher'
                    username = findProperty("ossrhUsername") ?: System.getenv("OSSRH_USERNAME")
                    password = findProperty("ossrhPassword") ?: System.getenv("OSSRH_PASSWORD")
                    stagingRepository('build/pre-deploy')
                }
            }
        }
    }
    release {
        github {
            enabled = false
        }
    }
}
You should securely pass your GPG password, Sonatype username, and Sonatype password to the JReleaser plugin. The Sonatype API username and password were created in the first step of this guide. It is possible to do this using CLI arguments, environment variables, or a local JReleaser configuration.
To create a local JReleaser configuration file, create a file ~/.jreleaser/config.properties with the following content:
JRELEASER_GPG_PASSPHRASE=YOUR-GPG
JRELEASER_MAVENCENTRAL_SONATYPE_USERNAME=YOUR-SONATYPE-API-USERNAME
JRELEASER_MAVENCENTRAL_SONATYPE_PASSWORD=YOUR-SONATYPE-API-PASSWORD
If all the steps are done correctly, you can run the following command to upload your artifacts to Maven Central. First, you can try a dry-run to check if everything is correct:
gradle jreleaserDeploy --dry-runAnd then if you want to upload artifacts to Maven Central automatically completing all steps like uploading, validation, and publication approval, run:
#DANGER: After this, you cannot delete your artifacts from Maven Central
gradle jreleaserDeploy
After that, the plugin will upload your artifacts to Maven Central and run a long polling process until the artifacts are validated and published. You can see the status of your artifacts in the Sonatype UI. Publication could take some time, so be patient. After the publication is completed, you can see your artifacts in the Maven Central repository and the valid status of deployment in the Sonatype UI.
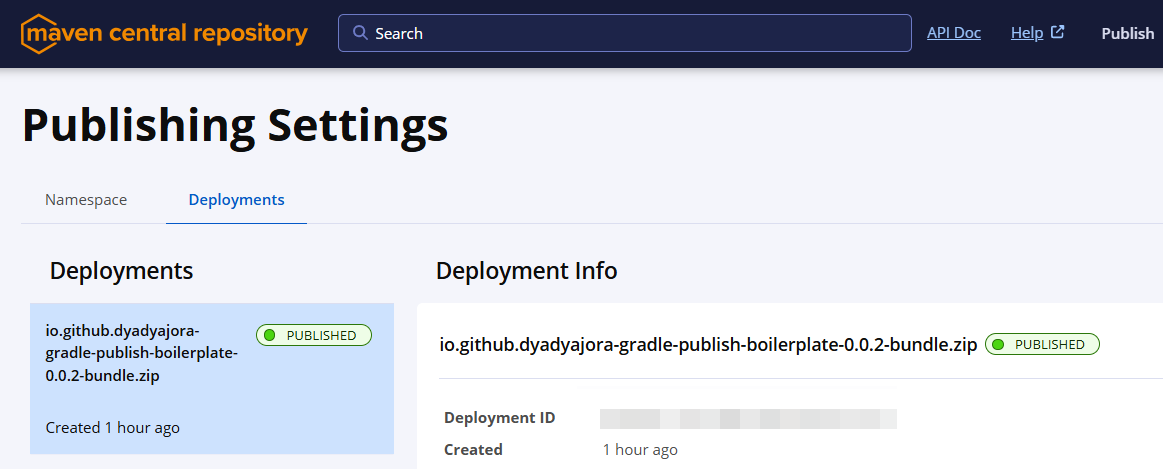
Artifact in published status
And now your artifact sources are available in the Maven Central repository by the link like above
repo1.maven.org/maven2/io/github/YOUR-GITHUB-USERNAME/ARTIFACT-NAME/VERSION/
For example, artifacts from this guide are available by the link:
repo1.maven.org/maven2/io/github/dyadyajora/gradle-publish-boilerplate/0.0.2/
Also artifact you be visible in the search on the sonatype search site.
This artifact could be used in your gradle.build file as a dependency from maven-central:
implementation group: 'io.github.dyadyajora', name: 'gradle-publish-boilerplate', version: '0.0.2'PROFIT!
All sources are available at github.com/dyadyaJora/gradle-publish-boilerplate, if you find it usefull please star ⭐ this repository.
Useful links
-
Sonatype Maven Central Documentation
-
Gradle maven-publish plugin
-
Using Apache Ant from Gradle
-
JReleaser Gradle Plugin
-
DigitalOcean Community | How to use GPG
-
FreeCodeCamp | How does pretty good privacy work