14 mins read
How to send data in Telegram WebApp Bot without external HTTP server using aiogram Python library
In this article, we explore how to create a Telegram WebApp bot in Python, the methods to launch a Telegram mini-app, how to create a WebApp using aiogram, how to process Telegram WebApp data without an external HTTP server, and how tg.sendData works.
Intro
In Telegram, there are several ways to process MiniApp (WebApp) data, depending on how the application is launched in the Telegram bot. Each method has its own features and limitations that must be considered during application development. Some methods require callback processing on an external server for data validation, while others simply send data to the bot using a JavaScript function and process it there.
In this note, we will look at how to send data in a Telegram bot using aiogram without using an external HTTP server, which applications this method is suitable for, and what limitations exist when using it. The full source code of the application is available on GitHub at the repository JoraDevLab/aiogram-webapp-keyboard-launch-starter, which can be used as a template for creating your own bot.
Prerequisites
This guide is ideal if you already know how to create bots in Telegram using BotFather and have basic knowledge of Python and the principles of aiogram. In this note, we will focus on the mechanisms of sending data using aiogram, rather than creating the bot itself.
To successfully run the code examples, you will need the following tools:
- Python 3.8+
- aiogram 3.20+
- PyCharm or another IDE for Python development
- VSCode 2023.2+ or any other IDE for web development
- Node.js 18.0+ and npm 8.0+ for local webapp testing
- Telegram account
Understanding webapp launching methods
A web application can be loaded in a Telegram bot in several ways:
- via an inline keyboard button,
- via a menu button,
- via a custom keyboard button.
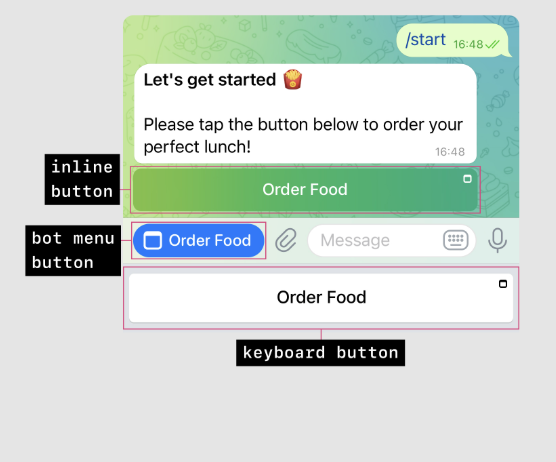
Ways to launch a webapp (image from https://core.telegram.org/bots/webapps)
What are the ways to get user data in a webapp?
- initData / initDataUnsafe: a string containing information about the user and their settings. It is passed to the webapp when it is launched and can be used to authorize the user. Available only when launching the webapp via an inline keyboard or menu button.
- sendData: a method that allows you to send data from the webapp to the bot. It can be used to transfer data collected in the webapp, such as a form or other user data. Available when launching the webapp via a custom keyboard button.
NOTE: initData and sendData
initData and sendData are two different ways to transfer data between the webapp and the bot in Telegram, which cannot be used simultaneously!
How to use initData in a webapp?
When launching a WebApp in Telegram via an inline keyboard or menu button (which is a type of inline button from the Telegram API's perspective), Telegram passes information about the user, query_id, and API answerWebAppQuery for multiple data submissions to the bot's backend. The mentioned user data is available in the context of the JavaScript application through the window.Telegram.WebApp.initData and window.Telegram.WebApp.initDataUnsafe objects. However, for proper user authorization, the information from initDataUnsafe must be sent to the bot's backend server for validation using a hash algorithm based on the message hashId and bot token (more details about the algorithm can be found in the official Telegram documentation). Therefore, in this case, an external HTTP server is required to validate the bot user's data.
A template application with a webapp launch via a menu button and user authorization through a separate HTTP server can be found in the aiogram documentation at github.com/aiogram/aiogram/tree/dev-3.x/examples/web_app.
How to use sendData in a webapp?
In this case, you need to use the window.Telegram.WebApp.sendData method to send data from the webapp to the bot. This method allows you to send data from the webapp to the bot without the need for an external HTTP server. The data is sent as a string and can be processed by a regular message handler in the bot.
What are the limitations when launching a webapp via a custom keyboard button?
- User information is not available in the UI: the UI does not have access to
tg.initDataortg.initDataUnsafe, so it is impossible to display user data in the interface or use user data for 3rd-party authorization. - Data can only be sent from the webapp once: after starting the webapp in the bot, data can only be sent to the bot using
tg.sendDataonce per webapp session. - 4 KB data limit: the maximum size of data that can be sent to the bot using
tg.sendDatais 4096 bytes. This limitation is due to the fact that the data is transmitted via URL and may be limited by the URL length.
Thus, the custom keyboard method is suitable for simple applications where the interface is used to fill out forms and send data to the bot for further processing once. If this solution suits you, let's consider the minimum necessary configuration to create such a bot in the following steps.
Step 1. Create a bot in BotFather
First, you need to create a new bot in @BotFather and get an access token. Skip this step if you already have a bot and an access token for it. To do this, follow a few simple steps:
- start a conversation with https://t.me/BotFather
- enter the command
/newbot - enter the bot's name
- enter the bot's username
- get the access token for the bot and save it for the next steps.
Step 2. Write the bot code using aiogram
In this step, we will create a bot using aiogram that will process data sent from the webapp. To run the bot from the examples in this note, simply activate the necessary venv (if available) and install the required dependencies from requirements.txt:
pip install -r requirements.txtWhen creating a new Python project from scratch, install the necessary dependencies:
pip install -U aiogram
pip install -U python-dotenv
Create a .env file in the project root and add the access token obtained in the previous step and the URL (which we will fill in later) for launching the webapp:
# .env
BOT_TOKEN=...
WEB_APP_URL=...
Create a file web_app_bot.py and add the bot code.
In this code, we create a bot that handles the /start command and sends the user a keyboard with a button to launch the webapp. When the button is pressed, the webapp is launched, which we will create in the next step. When the "ℹ️ Information" button is pressed, the bot sends the user a message with information about the bot. When the "🚀 Launch WebApp" button is pressed, the webapp is launched, which we will create in the next step.
import asyncio
import logging
from os import getenv

import dotenv
from aiogram import Bot, Dispatcher, types, F
from aiogram.filters import CommandStart
from aiogram.types import WebAppInfo, ReplyKeyboardMarkup

dotenv.load_dotenv()

API_TOKEN = getenv('BOT_TOKEN')
WEBAPP_URL = getenv('WEB_APP_URL')

bot = Bot(token=API_TOKEN)
dp = Dispatcher()
logging.basicConfig(level=logging.INFO)


@dp.message(CommandStart())
async def start(message: types.Message):
    """Handle the /start command from user and print custom keyboard."""
    kb = [
        [
            types.KeyboardButton(text="🚀 Launch WebApp", web_app=WebAppInfo(url=WEBAPP_URL))
        ],
        [
            types.KeyboardButton(text="ℹ️ Information")
        ],
    ]
    keyboard = ReplyKeyboardMarkup(
        keyboard=kb,
        resize_keyboard=True,
        input_field_placeholder="Choose an action"
    )
    await message.answer("Welcome! Choose an action:", reply_markup=keyboard)


@dp.message(F.text == "ℹ️ Information")
async def info(message: types.Message):
    """Handle the information button and print predefined message."""
    await message.answer("This is a Telegram bot with a WebApp interface. Click the first button to launch the WebApp.")


#@dp.message(F.content_type == types.ContentType.WEB_APP_DATA)
@dp.message(F.web_app_data)
async def web_app_data_handler(message: types.Message):
    """Handle data sent from the WebApp."""
    await message.answer(f"✅ Data received from WebApp:\n{message.web_app_data.data}")


async def main() -> None:
    """Start the bot."""
    await dp.start_polling(bot)


if __name__ == "__main__":
    asyncio.run(main())
Step 3. Create the UI
To create the webapp UI, you can use any framework for creating web applications, such as React, Vue.js, or just HTML and CSS. In this example, we will create a simple HTML application with a form that will send data to the bot when the "Send" button is pressed using plain JavaScript. Create a file webapp.html in the static folder and add the following code:
Connect the telegram-web-app.js script in the page header and create a button to send data to the bot.
<script src="https://telegram.org/js/telegram-web-app.js"></script>Initialize the tg object and use the tg.sendData function to send the filled form and current time to the bot. The full page code is presented below.
NOTE: --tg- CSS prefix
The variables with the --tg- prefix (e.g., --tg-theme-bg-color, --tg-theme-text-color) are CSS custom properties (also known as CSS variables) provided by the Telegram WebApp JavaScript library. These variables are dynamically set by Telegram to reflect the current theme of the Telegram app (e.g., light or dark mode) and allow developers to style their WebApps to match the Telegram interface.
<!DOCTYPE html>
<html>
<head>
  <meta charset="UTF-8">
  <title>Telegram WebApp</title>
  <meta name="viewport" content="width=device-width, initial-scale=1.0">
  <style>
    body {
      font-family: sans-serif;
      display: flex;
      flex-direction: column;
      align-items: center;
      padding-top: 50px;
      background-color: var(--tg-theme-bg-color, #ffffff);
      color: var(--tg-theme-text-color, #000000);
    }
    input {
      padding: 0.5em;
      font-size: 16px;
      margin-bottom: 20px;
      border: 1px solid var(--tg-theme-hint-color, #cccccc);
      border-radius: 4px;
      width: 80%;
      max-width: 300px;
    }
    button {
      padding: 1em 2em;
      font-size: 16px;
      background: var(--tg-theme-button-color, #2ea6ff);
      color: var(--tg-theme-button-text-color, white);
      border: none;
      border-radius: 8px;
      cursor: pointer;
    }
    button:hover {
      opacity: 0.9;
    }
  </style>
  <script src="https://telegram.org/js/telegram-web-app.js"></script>
</head>
<body>
  <h2>Telegram WebApp</h2>
  <input id="user-input" type="text" placeholder="Enter some data" />
  <button id="send-btn">Send Data</button>
  <script>
    const tg = window.Telegram.WebApp;
    tg.ready();

    document.getElementById('send-btn').addEventListener('click', () => {
      const userInput = document.getElementById('user-input').value;
      // const user = tg.initDataUnsafe.user; NOT SUPPORTED DURING INLINE BUTTON LAUNCH

      tg.sendData(JSON.stringify({
        timestamp: Date.now(),
        userInput: userInput
      }));
    });
  </script>
</body>
</html>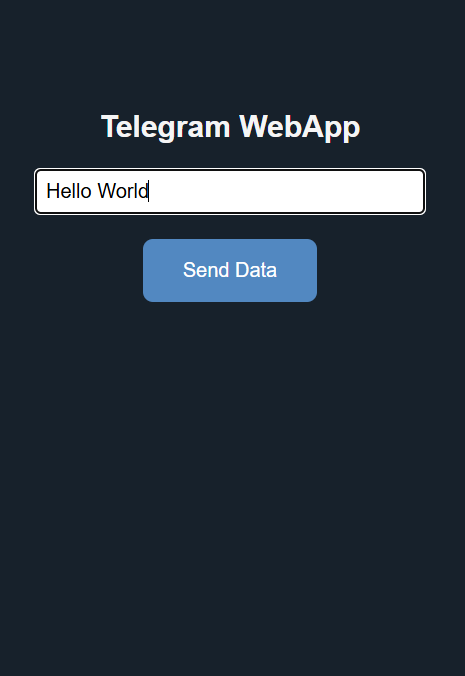
The interface of our webapp, opened in Telegram
Step 4. Process web_app data in the bot
Write a handler for the data sent from the webapp to the bot in the web_app_bot.py file using aiogram. This is done using the F.web_app_data filter.
@dp.message(F.web_app_data)
async def web_app_data_handler(message: types.Message):
    """Handle data sent from the WebApp."""
    await message.answer(f"✅ Data received from WebApp:\n{message.web_app_data.data}")
In this handler, we simply send back the data that was sent from the webapp to the bot. In a real application, you can use this data for further processing, such as saving it to a database or sending the user a message with the processing results.
NOTE: Filters F.web_app_data and F.content_type
The difference between using F.content_type == types.ContentType.WEB_APP_DATA and the F.web_app_data filter in aiogram lies in the mechanism of filtering incoming updates.
F.content_type == types.ContentType.WEB_APP_DATA is a lower-level filter that checks the content type of the message. It can be used to filter messages by various content types, including text messages, photos, etc. In this case, it checks whether the message type is WEB_APP_DATA.
F.web_app_data is a higher-level filter specifically designed to handle data sent from a WebApp. It automatically processes incoming messages if they contain the web_app_data field. The latter method is more versatile, as the presence of this field in the message guarantees that data from the webapp was received.
Step 5. How to set up local Telegram WebApp launch?
Run a local static server from the static folder using the npm serve library:
cd static
npx serve
Check that the server is running and accessible at http://localhost:3000/webapp.html. If everything works, proceed to the next step.
Now you need to make the bot aware of the address where the webapp is available. Telegram does not allow launching webapps at a local address, so you need to use a public address over the HTTPS protocol. For testing, you need to use a port forwarding service to make the local server accessible from the internet. Use VSCode Port Forwarding for this. Open your project in Visual Studio Code. Go to the PORTS tab, as shown in the screenshot, and click the "Forward a Port" button, enter 3000. After that, a link to your local server, which will be accessible from the internet, will appear at the bottom. Go to the visibility menu item and select Public. Insert the obtained link into the .env file in the WEBAPP_URL variable.
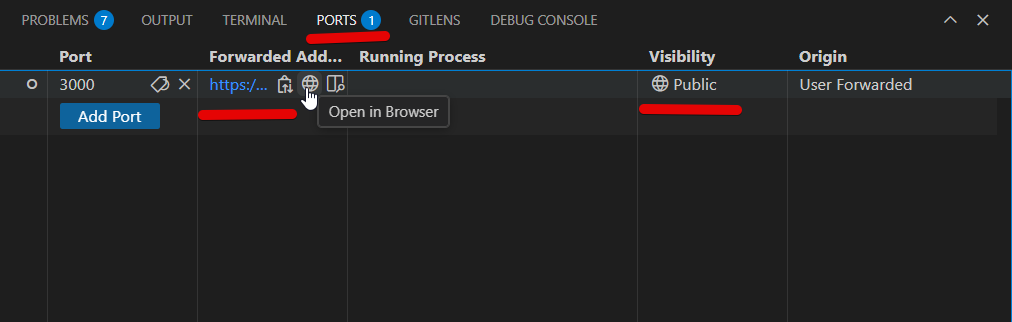
Setting up port forwarding in VSCode
DO NOT FORGET TO TURN OFF PORT FORWARDING AFTER TESTING TO AVOID EXPOSING YOUR COMPUTER TO RISK.
Step 6. Testing it all together
- Run the bot with the command
python web_app_bot.pyin the terminal or in your IDE. - Start a conversation with the bot using the
/startcommand and go to the bot's menu. - Click the
🚀 Launch WebAppbutton to open the web application. - Enter data in the form and click the "Send" button.
- Check that the data was successfully sent to the bot and processed - confirmation of this will be a system message in the chat with the bot
Data from the "🚀 Launch WebApp" button was transferred to the bot.as shown in the screenshot.
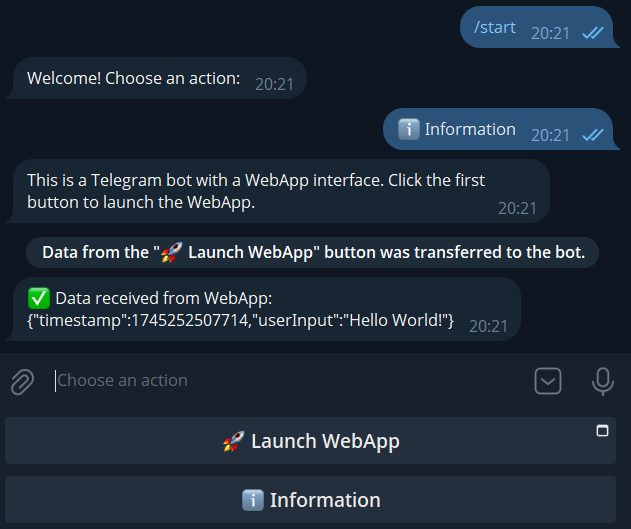
Example of using a webapp in Telegram
PROFIT!
Conclusion
Thank you for reading this note to the end! The source code of the application is available on GitHub at the repository JoraDevLab/aiogram-webapp-keyboard-launch-starter. If you have any questions or suggestions, feel free to open an issue in the repository, and please star ⭐ the repository if you found this article helpful. Good luck with developing your Telegram WebApp bots!