9 mins read
Setup AIS Marine Traffic Station on Raspberry Pi with RTL-SDR dongle
Learn how to build an AIS station on Raspberry Pi using an RTL-SDR dongle to track ships in real time! This step-by-step guide covers how to setup rtl_ais, how to configure AIS data streaming, and how to build MarineTraffic integration. Automate everything with Ansible and start monitoring marine traffic effortlessly!
Introduction
The goal of this article is to provide a simple step-by-step guide for setting up an AIS station on a Raspberry Pi using an RTL-SDR dongle for MarineTraffic.
What Is an AIS Station and Why Use Raspberry Pi?
I understand that using a Raspberry Pi with an RTL-SDR dongle might be overkill for this task, but it is a fun and educational project, which is not clearly described in the documentation.
Since the official documentation recommends AIS Dispatcher, this method is not suitable for Raspberry Pi with an RTL-SDR dongle,
primarily because it only supports serial USB devices, and the main problem is that RTL-SDR is not a classic serial UART device, so it cannot be recognized as serial by aisdispatcher.
In this article, I want to share my experience and provide an installation guide on how to set up an AIS station as easily as a FlightRadar feeder.
You can find an Ansible playbook and setup commands in the repository https://github.com/dyadyaJora/ansible-rpi-ais-on-rtl-sdr, so you can refer to it for code examples.
Please star ⭐ this repository if you find it useful!
Prerequisites
- Raspberry Pi or compatible Linux system (ARM-based)
- RTL-SDR USB dongle
- Antenna suitable for marine VHF frequencies
- SSH access to the target machine
- For best results, your location should be near active shipping routes.
How to Register Your AIS Station on MarineTraffic
You should also have a MarineTraffic account to create a station. If you haven't done this yet, go to https://www.marinetraffic.com/en/users/my_account/stations/index and click the "Add Station" button. Fill in the required information and submit the form.
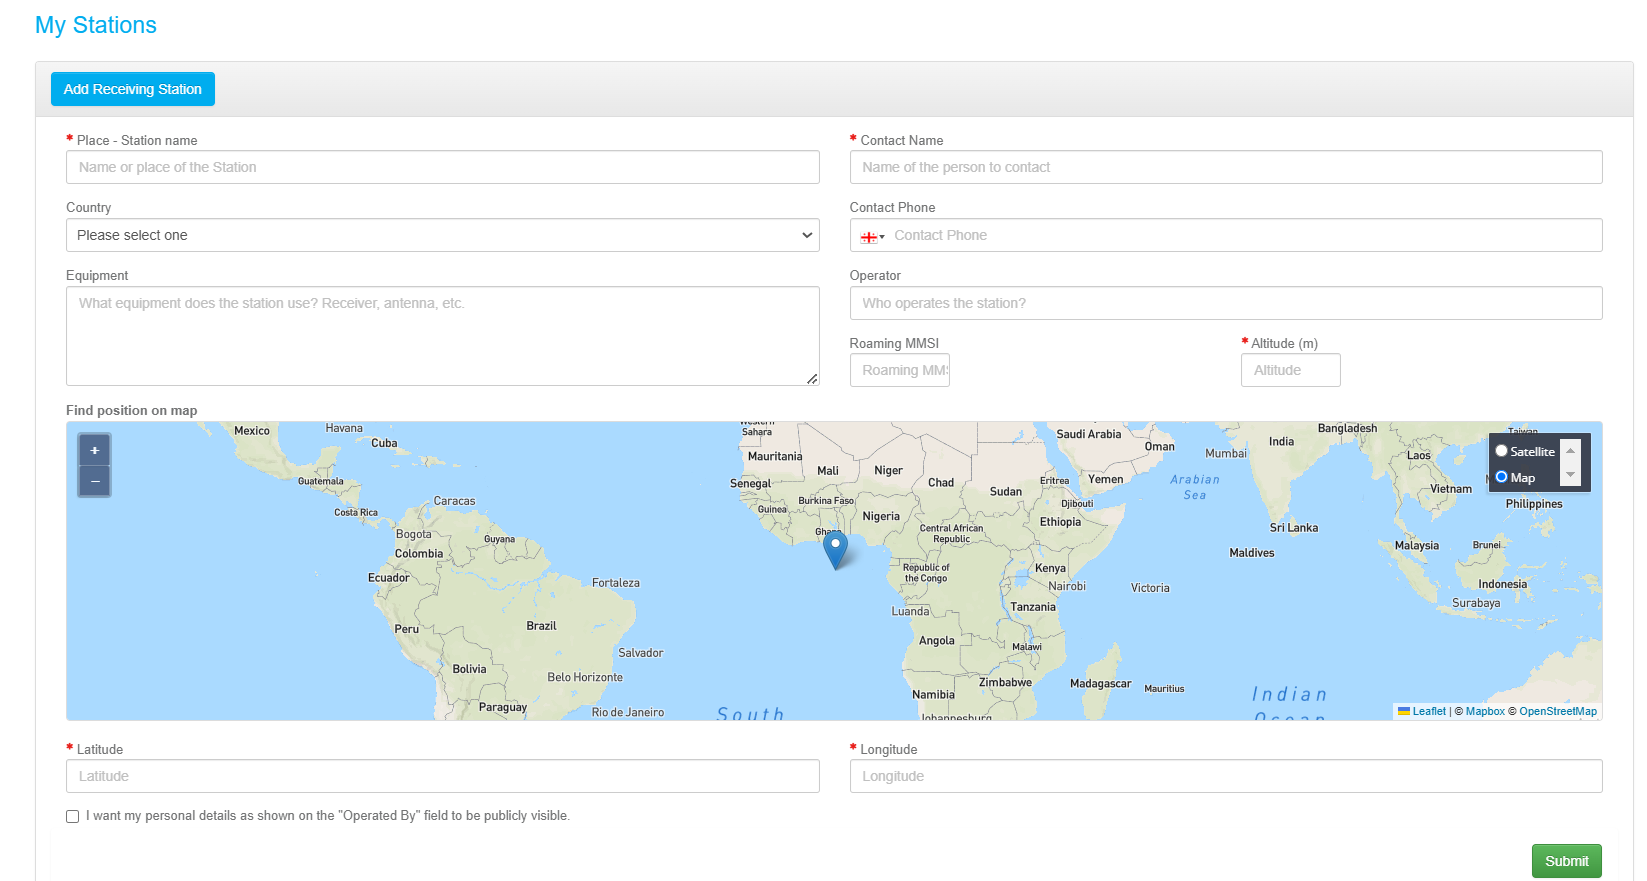
How to create a station on MarineTraffic
After that, you will receive an email with your IP and port to send data from your station. Save it for further use.
Installation
Step 0. Overview
AIS Dispatcher can receive data in two ways - from a serial device or from the network. So there are also two ways to solve the problem with serial device recognition:
- create emulation of a serial USB device for RTL-SDR
- send decoded AIS data over the network with other software.
For this guide, we'll use the second option.
The rtl-ais package provides a tool to decode AIS signals and send them over the network.
It is a command-line tool that can be run on a Raspberry Pi with an RTL-SDR dongle connected to it.
The tool will listen to the AIS signals and send them to a local IP address and port, where the aisdispatcher can pick them up and send them to MarineTraffic.
So we will install rtl-ais for working with the RTL device and the recommended aisdispatcher with aiscontrol. And then configure them to work together like on the schema below.
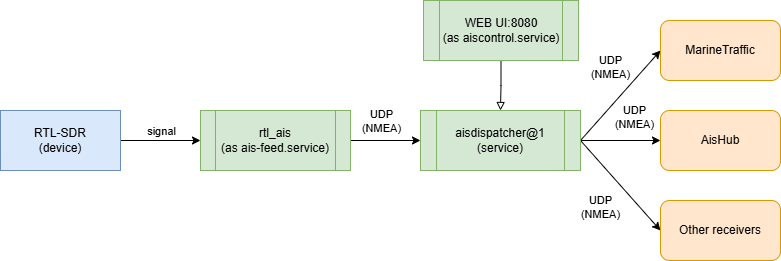
How AIS Data Is Processed: Software Overview
It should be noted that the use of aiscontrol and aisdispatcher is optional.
rtl_ais allows sending decoded AIS data as an NMEA string over TCP or UDP but only to one receiver.
If you work with one receiver, it would be totally enough for you.
But if you want to share this data with multiple receivers, aisdispatcher would help you with that.
aiscontrol is a manager of dispatcher processes and a web interface to interact with your data and configuration.
It is also optional, but it is a convenient tool to monitor your data and display a map with received information hosted on your Raspberry Pi.
Step 1. Install and configure rtl_ais
First, I recommend verifying that your RTL-SDR dongle is working correctly and not busy by other processes.
You can use the rtl_test utility to check it.
rtl_testIf your device is detected, lets learn how to install and configure rtl_ais for AIS Signal catching and decoding.
Install the required dependencies:
sudo apt update
sudo apt install -y gcc-12-base:armhf libc6:armhf libgcc-s1:armhf libidn2-0:armhf libpthread-stubs0-dev:armhf librtlsdr-dev:armhf librtlsdr0:armhf libudev1:armhf libunistring2:armhf libusb-1.0-0:armhf libusb-1.0-0-dev:armhf
Then download the latest (0.4.3-stable version for now) rtl-ais deb package for armhf architecture from the repository and install it:
wget https://launchpad.net/~sailoog/+archive/ubuntu/openplotter/+files/rtl-ais_0.4.3-stable_armhf.deb
sudo dpkg -i rtl-ais_0.4.3-stable_armhf.deb
Run rtl_ais with the following command to verify installation:
rtl_ais -nThe -n option enables logging of received NMEA strings to the console.
You should see something like this:
Found 1 device(s):
  0:  Realtek, RTL2838UHIDIR, SN: 00000001
Using device 0: Generic RTL2832U OEM
Edge tuning disabled.
DC filter enabled.
RTL AGC disabled.
Internal AIS decoder enabled.
Buffer size: 163.84 mS
Downsample factor: 64
Low pass: 25000 Hz
Output: 48000 Hz
Detached kernel driver
Found Rafael Micro R820T tuner
Log NMEA sentences to console ON
AIS data will be sent to 127.0.0.1 port 10110
Tuner gain set to automatic.
Tuner error set to 10110 ppm.
Tuned to 162000000 Hz.
Sampling at 1600000 S/s.
Allocating 12 zero-copy buffers
...
As soon as you receive any AIS signal from ships, their NMEA strings will be printed to the console
By default, rtl_ais sends decoded AIS data to 127.0.0.1:10110.
You can change this behavior by specifying the -h and -p options.
To ensure that it starts automatically at boot, runs in the background without user intervention, and can be easily managed, let's create a service for the rtl_ais feeder.
Create a service file /etc/systemd/system/ais-feed.service with the following content, filling in the required fields in the template:
[Unit]
Description=RTL-AIS feed service
After=network.target

[Service]
Type=simple
ExecStart=/usr/bin/rtl_ais -d {{ rtl_ais_device_index }} -h {{ rtl_ais_host }} -p {{ rtl_ais_port }} {{ rtl_ais_extra_opts }}
Restart=always
RestartSec=5
User={{ rtl_ais_user | default('root') }}
Group={{ rtl_ais_group | default('root') }}
StandardOutput=journal
StandardError=journal

[Install]
WantedBy=multi-user.target
Then reload systemd and enable the service:
sudo systemctl daemon-reload
sudo systemctl enable ais-feed
sudo systemctl start ais-feed
You can check the service status with the following command:
sudo systemctl status ais-feedStep 2. Install and configure aisdispatcher
Install aiscontrol and aisdispatcher following the official documentation:
wget https://www.aishub.net/downloads/dispatcher/install_dispatcher
chmod 755 install_dispatcher
sudo ./install_dispatcher
Next, configure aisdispatcher to receive data from the rtl_ais feeder.
This can be done through the web interface of aiscontrol or via configuration files.
Let's explore both methods.
Configuring aisdispatcher via Web Interface
Open the web interface of aiscontrol by navigating to http://<your_rpi_ip>:8080 in your browser.
You will see the login page, where you should enter the default credentials: admin for both username and password.
After a successful login, you will see the main page with the status bar and the menu on the left side.
Navigate to the Configuration tab and change the Input section from Serial to UDP Mode.
Fill in the required fields with the following values (if you didn't change the default values in the rtl_ais service file):
Host:127.0.0.1Port:10110
Fill in the Output section with the data you received from MarineTraffic in the email.
After that, click the Save button and then Restart to apply the changes.
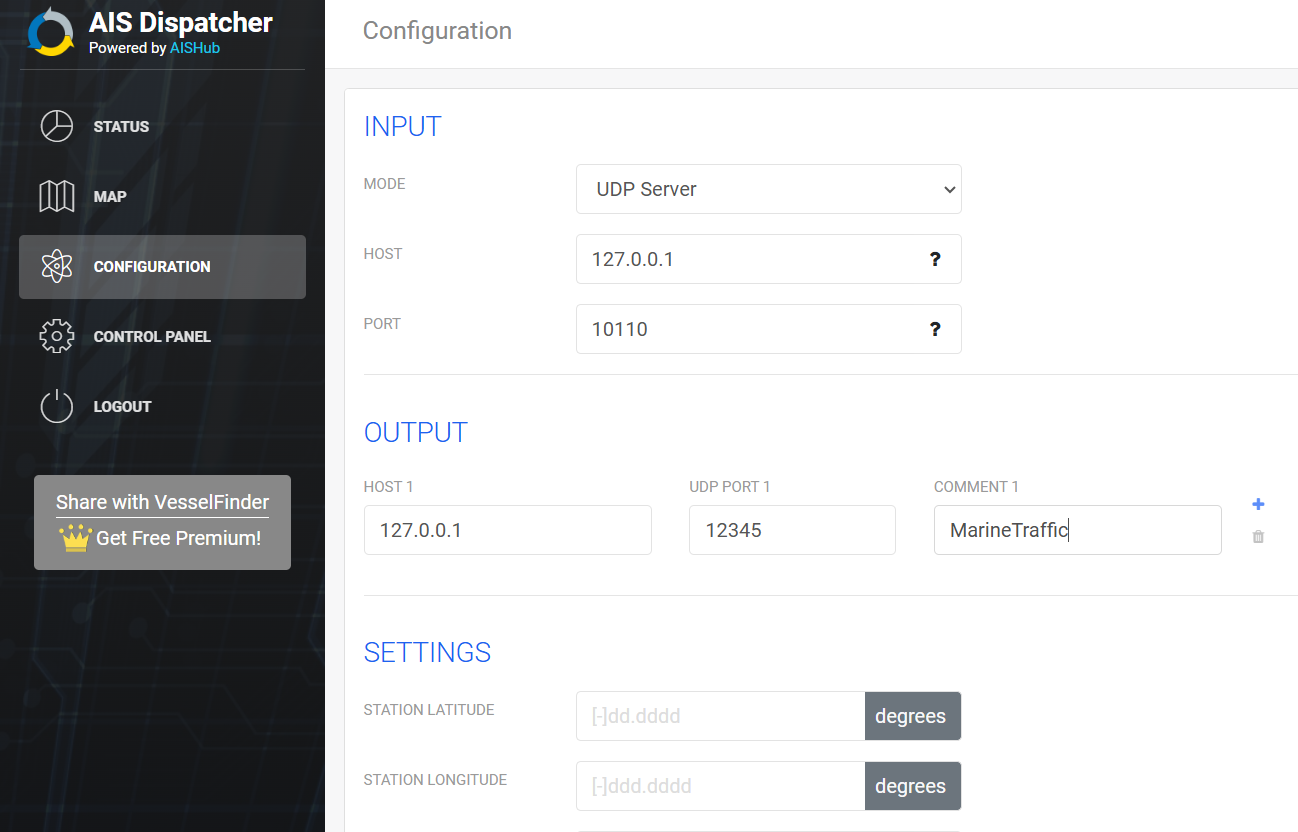
Dispatcher configuration
Manual Configuration of aisdispatcher via CLI
As an alternative, you can configure aiscontrol and aisdispatcher by editing the configuration file directly.
By default, aisdispatcher is installed in the ais user's home directory.
You can find the command line options configuration file in /home/ais/etc/aisdispatcher/aisdispatcher_rPiAIS001.opts where rPiAIS001 is the name of the dispatcher service instance.
You can also edit the aisdispatcher configuration file in /home/ais/etc/aisdispatcher.json to configure multiple dispatcher services.
After finishing the configuration, you should enable and start the aisdispatcher service from the ais user to apply the changes:
sudo -u ais XDG_RUNTIME_DIR=/run/user/$(id -u ais) systemctl --user enable aisdispatcher@rPiAIS001
sudo -u ais XDG_RUNTIME_DIR=/run/user/$(id -u ais) systemctl --user start aisdispatcher@rPiAIS001
Check that the service is running:
sudo -u ais XDG_RUNTIME_DIR=/run/user/$(id -u ais) systemctl --user status aisdispatcher@rPiAIS001How to Check if Your AIS Station Is Working Correctly
Wait until ships are within range of your antenna and you will see their NMEA strings in the console and check the status bar on your aiscontrol Raspberry Pi web interface. As confirmation of successful installation, you should see the green status bar with the number of received messages and ships in range. Also, once MarineTraffic starts receiving data from your station, you will get a confirmation email.
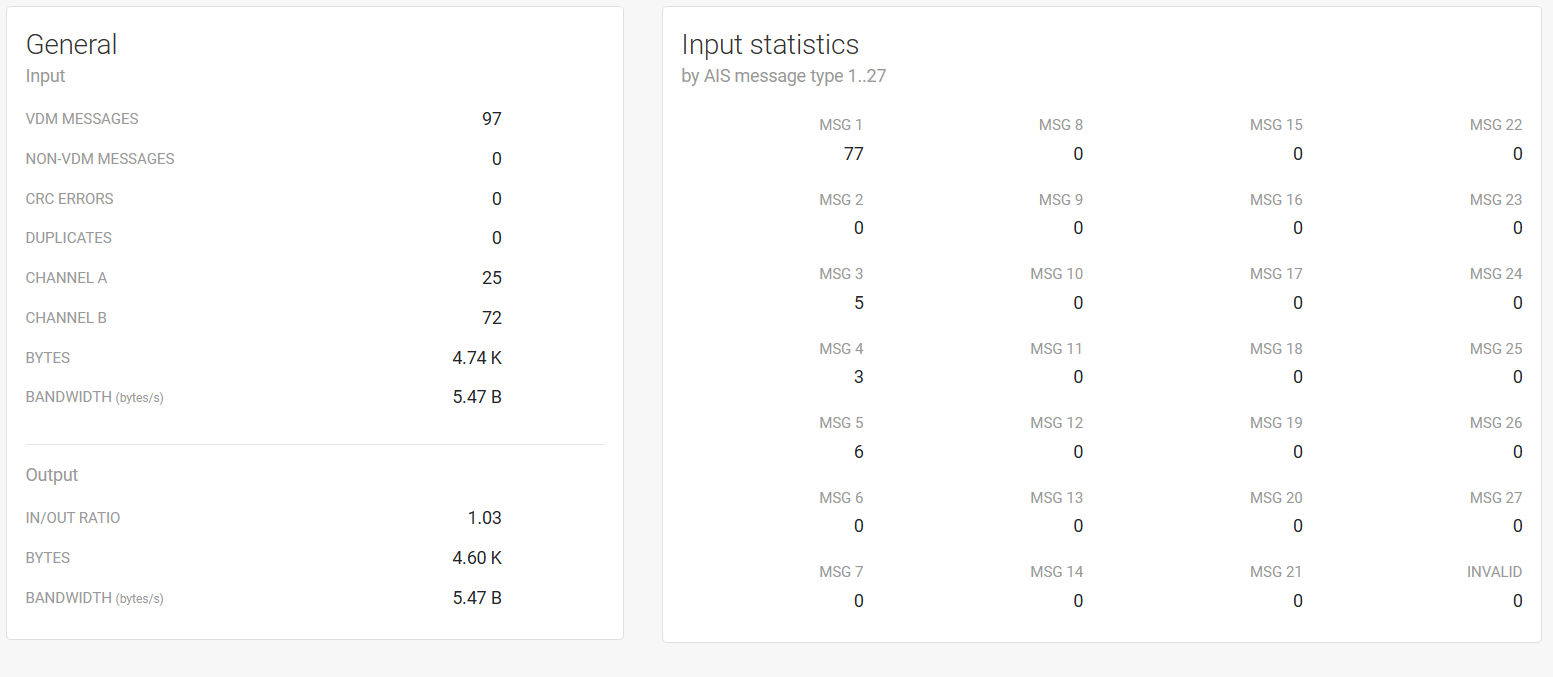
Status tab with data
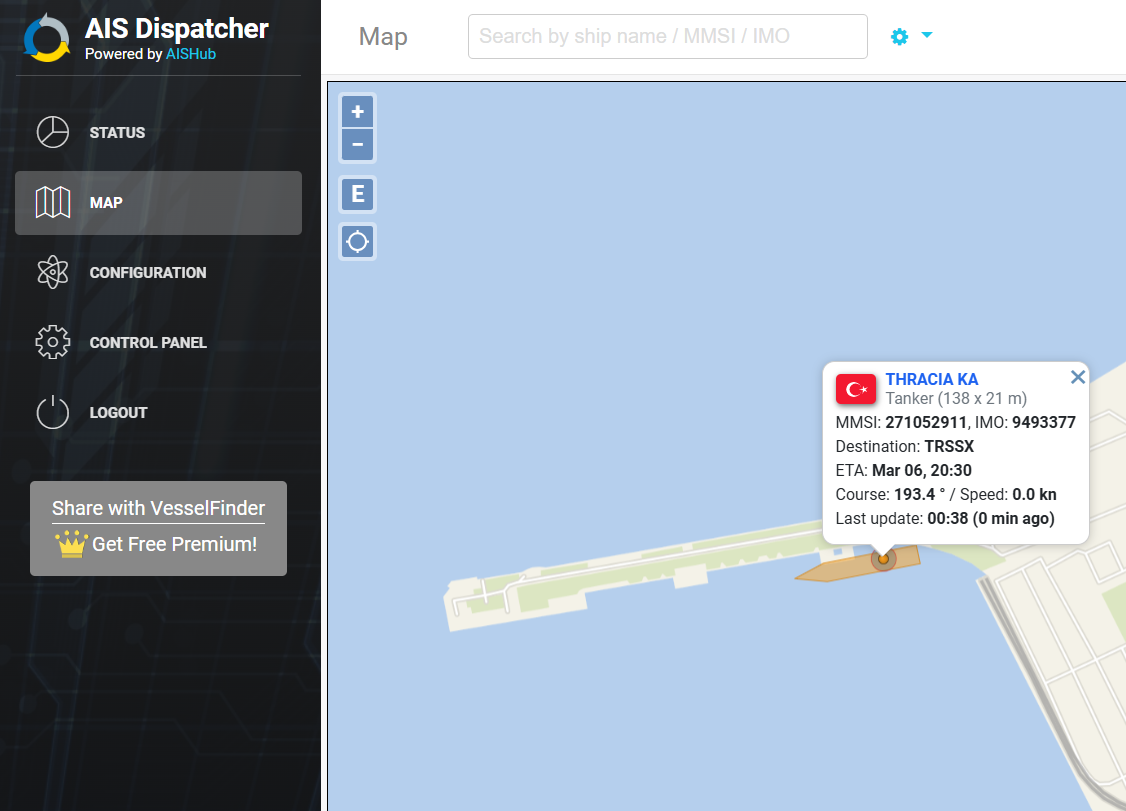
Map tab with ship info
Ansible automation
To run all the mentioned installation steps automatically, you can use my Ansible role from the repository https://github.com/dyadyaJora/ansible-rpi-ais-on-rtl-sdr.
Just clone the repository and fill in the inventory file with your Raspberry Pi IP address and run the playbook:
git clone https://github.com/dyadyaJora/ansible-rpi-ais-on-rtl-sdr
cd ansible-rpi-ais-on-rtl-sdr
ansible-playbook -i inventory.yml site.yml
PROFIT! 🎉